Do you remember when I launched this blog and asked you what you wanted to learn, the number one answer was more about Free Motion Quilting. Well I am no expert on the subject, so I decided to find one for you. Linda from Stray Stitches was kind enough to steer me towards my guest today.
Let me introduce you to my wonderful guest post today. Have you heard of the Free Motion Quilting Project? It is a project that was started by Leah Day, quilter, artist, wife and mother. She is here today to share with you her vast knowledge of Free Motion Quilting on a HOME MACHINE. After reading her post, I cannot wait to tackle it on my own machine and I know I will be a lot less intimidated now!
Free Motion Quilting – Practice Makes Perfect
By Leah Day
www.freemotionproject.com
Ask any quilter, check any quilting poll, and check any message forum and you will find quilters asking about the exact same thing: Free Motion Quilting.
How do you do it?
How does it work?
How do you get nice stitches?
How do you get control over a big quilt?
How do you manage to quilt it on a small machine?
And you will find answers, loads and loads of answers to these questions that sum up all the facts over one, two, or three pages of solid, impenetrable text.
But free motion quilting really isn’t something you can learn from reading a book! It’s not something you can learn by memorizing facts!
In order to master free motion quilting, in order to learn how to quilt your own quilts, you must actually start quilting them!
And the only way to get comfortable quilting is if you practice stitching one design.
Why only 1 design?
Quilting one single design will teach you loads about free motion quilting. It will help you learn how to move and position the quilt, control the speed of your machine, and the movement of your hands. You don’t need to learn 30 designs to master free motion quilting – you really only need to learn ONE!
And if we’re picking just one design, we might as well practice stitching the most popular, most widely known free motion design: Stippling
So let’s get started with a simple practice exercise!
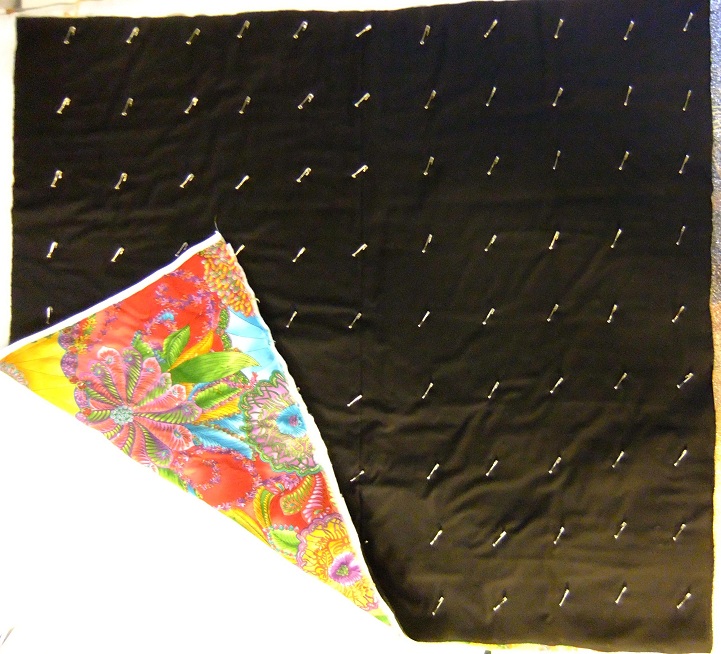
1. This is a practice quilt:
This quilt is just 1 yard of top fabric, backing fabric, and batting that has been basted is now ready to be quilted.
Note: I pin baste my quilts, but you can use spray baste or hand baste here instead. Just get the layers together securely using your favorite method.
Note 2: No, I don’t expect anyone would make a quilt out of a single piece of black fabric! Feel free to use another fabric, or even piece a small quilt, but try to choose fabric and thread that contrast so you can see what you’re doing as you quilt.
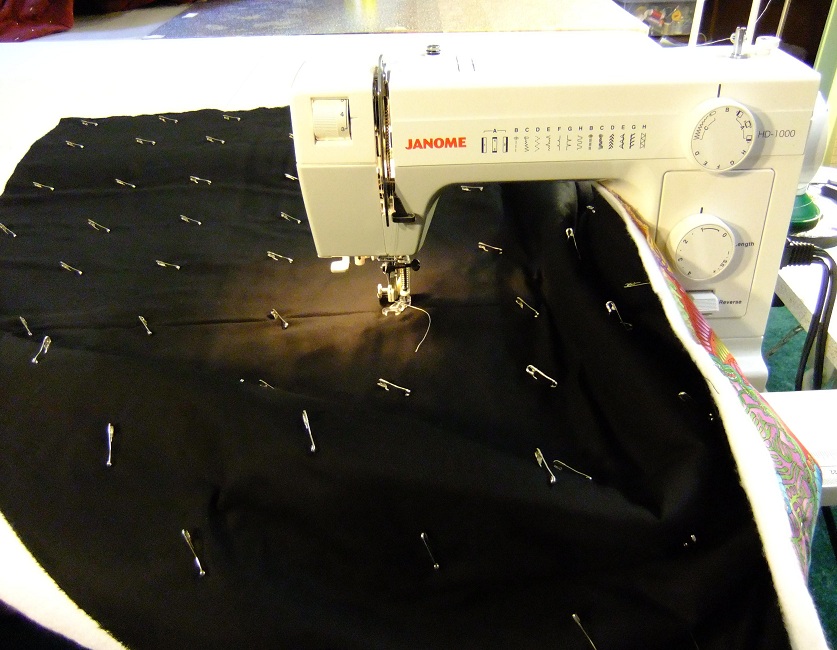
2. Start in the middle:
It’s far easier to quilt from the middle of the quilt and get the hardest section completed first. This way you will continually move from the tougher area of the quilt to the easier areas, and will be dealing with less bulk and weight of the quilt at any given time.
To start, use the hand wheel on the side of your machine to take the needle down into your quilt then back up again. Tug lightly on the top thread as you do this to bring the bobbin thread to the surface of your quilt. Hang onto both threads as you start stitching so the bobbin thread stays on the top and doesn’t make a mess on the back of your quilt.
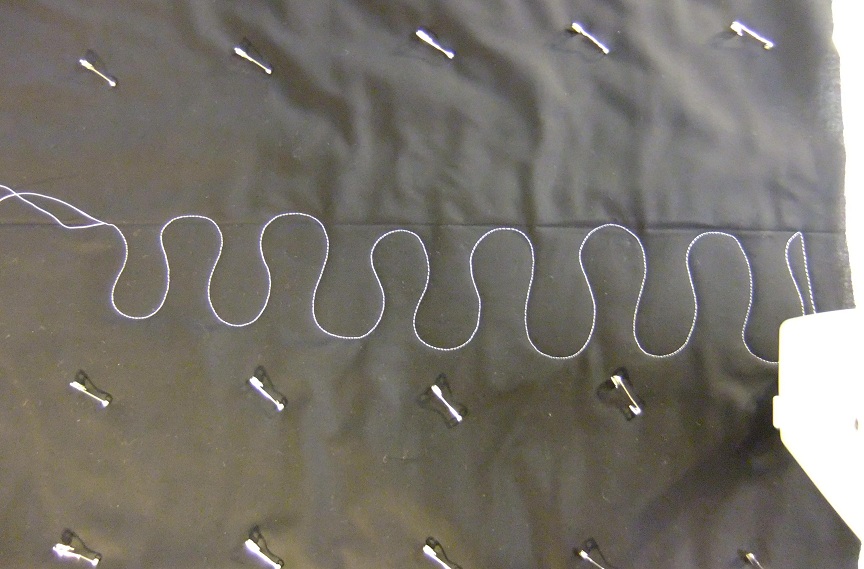
3. Stitch a row of U shapes:
Swirl up and down to create gently curving shapes from the middle to the right side of your quilt. This might not look like much now, but this is a super simple version of Stippling.
Let’s learn a bit about this design:
Stippling is also called meandering is has a simple rule: curve and wiggle a random line around your quilt without crossing this line at any point.
So that line of wiggly U shapes – that is a basic form of Stippling, minus the randomness. This is much easier to learn because it’s simple and will allow you to concentrate more on moving your quilt and controlling your speed than on worrying about the design.
4. Break that Quilt into Quadrants:
The vast surface of a quilt can be an intimidating thing. The easiest way to cover a quilt with 1 single design is to break it up into manageable chunks with rows of your quilting design.
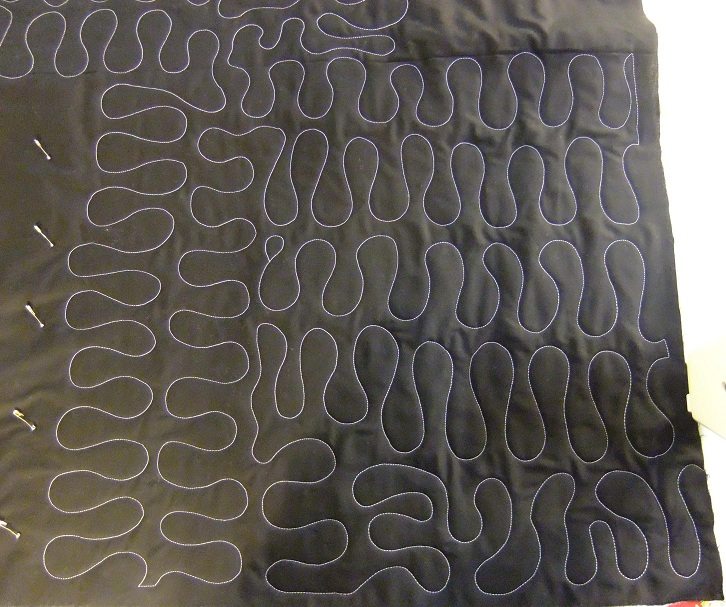
We already stitched a row of Stippling from the middle of the quilt to the edge. Now just stitch down the edge and quilt back into the middle with that same wiggly line:
Here’s an interesting question – which direction felt more natural for you to quilt? Did it feel more natural to quilt from the middle to the right or from the right back into the middle? Pay attention to the direction you’re stitching and try rotating your quilt so the direction you’re moving always feels natural and easy for you to move.
Tip to Remember – if the quilt or your body seem to be fighting you – change something!
Now stitch from the middle to the other sides of the quilt, then back into the middle to break the quilt into 4 quadrants. This will not only knock out the hardest section of the quilt, it will also allow you to easily fill each corner of the quilt without having to shift the entire quilt through your machine.
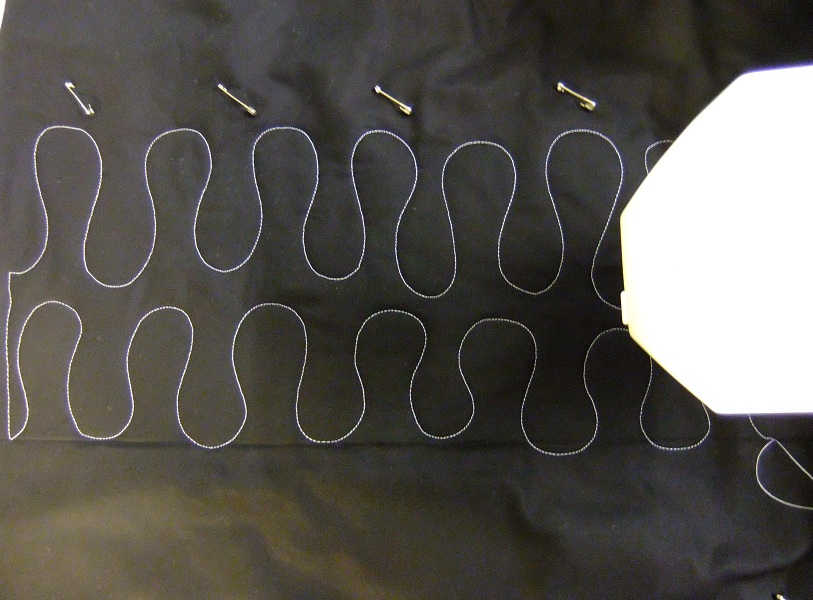
5. Fill each quadrant:
At this point your quilt will be completely quilted through the center section and have lines of quilting breaking up the sides to leave 4 open quadrants.
Now it’s time to fill each quadrant with more rows of simple stippling:
Simply stitch more rows from the inner corner of the quadrant to the edge of the quilt, then back into the middle until the entire quadrant is filled.
Fill each quadrant of your quilt in this manner, always paying attention to which directions and angles feel easy to stitch in and which feel more difficult. Again, if it feels like a struggle to stitch your design, chances are your design will show it!
6. Keep playing with Stippling:
How are you feeling about our wiggly line design? Are you getting a bit bored stitching this single line of U shapes?
As soon as you start feeling bored, start playing with your design! Add a bend or extra curve and soon you will have a very random design.
Now for a few frequently asked questions about free motion quilting:
Question – How do I quilt this huge 70 inch (or 80 inch or queen or king sized) quilt on a small machine? Answer – The easy answer is – you don’t! You never put all 70 inches into the arm of your sewing machine! You only slide it into the middle, which means you only ever put HALF that amount into your machine. So a 70 inch quilt is really only 35 inches IN the machine arm, and most of the bulk and weight of the quilt can be bunched up behind the machine, not actually inside the arm.
Question – What about where you start quilting each quadrant? Won’t that leave a noticeable open line when you start stitching? Answer – Look back to Photo 6 and see how I started that quadrant by stitching a simple tear drop shape. You can hide this loose line this way, or you can interconnect it with your previous lines of quilting.
Truly though – who cares?! No one is going to look at your quilt and remark “Oooo, I see where you started quilting!”
Question – I don’t want to quilt the way you’ve shown in this article! How do I quilt with different designs? Answer – There are actually many ways to use free motion filler designs on your quilts. You don’t have to pick just 1 design and quilt it over the entire quilt, though this is the best way to learn a design, and the best way to quilt when you’re first starting out.
Every quilter is different, and every quilter makes different quilts. Make sure to check out my other videos on other styles of quilting at:
http://www.daystyledesigns.com/howdoiquiltthis.html
Now that you know one simple design and have a game plan for using it on a simple quilt….
Let‘s go quilt!
Leah Day



This does clear up some of the mystery. And I really like that there is a “stick to the basics” theme – that’s the way to keep us focused – start small, with one design, then once we master it we can move on. I sometimes forget this and end up with a big load of frustration. I think I’m going to try this on a small project. It might not be the most amazing quilting, but it will be my own, and that’s what counts! Thanks so much, M, for hunting down a great teacher, and thanks, LD, for laying it out so plainly!!!
Thank you so much for breaking down free motion quilting for me!! I cannot wait to try it out on an quilted advent calendar I am making! 🙂 Thank you Melissa for finding someone in the know!
I’ve been machine quilting for more than 20 yrs….not well, mind you, but well enough to sort of suit me. I don’t think that that “quilting” of the quilt process will ever be my favorite part because my quilting is so-so. For that reason I always relish the chance to learn from someone who is confident at what they do. Thank you, Melissa, for taking the time to find Leah and to Leah for sharing the basics. You have reminded me that quilting is like anything you want to get good at whether it be skipping rope or playing the piano, a person must practice to make perfect. I expect my quilting to be excellent and get frustrated when it is not but I never take time to practice! That is going to change! I will take the time because I want to be pleased with the entire
process. Thanks, ladies! Hope you both have a great weekend!
Thank you, Leah Day! This is great!
And thank you, Melissa, for responding to all of those requests for some help with FMQ! It’s something I’ve been nervous about (on both my Longarm and my sewing machine), but I’m going to need to practice some more at some point. 🙂
~Brandy M.
Leah’s designs are so great and her tutorials with each one really takes a lot of the guess work out. Thanks for a great interview post!!
Thanks for the excellent guest blog. Leah day thank you for all of the work that you put into your tutorials, you have been an inspiration and valuable reference for me for a year now!
Just what I needed to read today- thanks for Leah’s great advice and guest post!
Awesome! I love Leah’s blog – she has inspired me to try so many different designs. I actually did a sampler quilt of 12 different blocks, each with a different FMQ design; all but one came from her blog. I just wanted to try a few new ones and build confidence.
I quilt all my quilts on my sewing machine and was fortunate enough to take a class with leah – a life changing experience. She is the most encouraging, down-to-earth teacher ever – plus a lot of fun. Her blog is worth its weight in gold.
I can’t wait to try this one! Breaking it down and I really like sticking to the basics. Thank you.
Well Leah, again you continue to explain fully the whys of doing things. After 246 days of reading your blog….. I do believe it is time to start practicing…. the dogs are going to love the new mats I will make for them just in time for winter! Oh, and my brain will give up a big chunk of guilt as I am going to quilt the apricot and blue curtains that were never finished …… thank you for giving us so much motivation.